
You know those days when the fridge is full of squash and you’re wondering what to do with it again? I’ve been there too. That’s exactly why I love this fried squash recipe—it’s simple, quick, and turns everyday squash into something everyone gets excited about. Whether you’ve got a garden overflowing or picked up a few too many at the farmers’ market, this recipe gives you a fun, flavorful way to use them up.
You’ll learn how to get that just-right crispy coating, how to fry without making a mess, and even how to mix things up with zucchini if you’ve got both on hand. We’re keeping it practical, delicious, and totally doable—no fancy equipment or special ingredients required. Let’s get into it!
Why You’ll Love This Crispy Fried Squash Recipe
There’s just something special about gathering around the kitchen when a skillet of golden, crispy squash is sizzling away. If you’re like me and love recipes that are easy to throw together but still feel nostalgic and comforting, then this fried squash recipe will be right up your alley. It’s the kind of dish that brings everyone to the table with a smile—and maybe even a second helping.

Here’s what makes this recipe a favorite in our house:
Family-friendly and picky-eater approved
Kids love the crunch, grown-ups love the flavor—it’s a win all around. No fancy flavors, just familiar goodness.
Quick and easy to make
With a few basic pantry ingredients and a hot skillet, you’ll have crispy squash on the table in under 30 minutes. Perfect for busy evenings.
Great way to use up summer squash or zucchini
Whether you’ve got a garden full or a few stragglers in the fridge, this is a tasty way to enjoy them. You can even make fried squash and zucchini together—same method, same crunch.
Customizable coating
Stick with the classic flour and cornmeal, or try panko or spices to change things up. You can easily adjust it to fit your family’s taste.
Pairs with just about anything
Serve it as a side dish, afternoon snack, or part of a backyard cookout spread—it fits in anywhere.
Minimal mess, big flavor
No need to deep fry or get complicated. Just a skillet, some oil, and a little bit of love.
Honestly, once you make this once, you’ll probably start craving that golden, crispy texture every time squash season rolls around.
Now that you know why this recipe belongs in your rotation, let’s take a look at what you’ll need to make it happen.
Simple Ingredients for Crispy Fried Squash
Let’s talk about what you’ll need to make this crispy fried squash recipe. It’s a simple list—no fancy ingredients, just a handful of kitchen staples that come together to create the kind of comforting, golden crunch we all love. You’ll also find a few optional ideas if you want to switch things up or give it a little flair.
Here’s what to grab:
- 4 small yellow squash, sliced into ¼-inch rounds
These are the star of the show! Choose squash that’s firm and smooth for the best texture. - ½ cup all-purpose flour
This gives the squash its first light layer, helping the rest of the coating stick and brown evenly. - ½ cup fine yellow cornmeal
Adds that classic crispy edge and a hint of Southern flavor. - 1 teaspoon kosher salt
Enhances the natural taste of the squash and the crust. - ½ teaspoon ground black pepper
Just enough to balance out the coating with a little bite. - ½ teaspoon garlic powder
Brings in subtle savory flavor without overpowering the veggies. - ¼ teaspoon smoked paprika
A small touch of smoky warmth that deepens the flavor and color. - 1 large egg
Beaten and mixed with milk, this helps everything stick to the squash slices. - ¼ cup milk
Loosens the egg just enough for smooth dipping. - Vegetable oil, for frying
Use enough to coat the bottom of your skillet—usually about ½ inch deep is perfect.
Optional Add-Ins
- 2 small zucchini, sliced (great if you want a mix of squash and zucchini)
- Pinch of cayenne, for a gentle kick
- 2 tablespoons grated Parmesan, mixed into the coating for an extra savory finish
Pro Tip: Want to give this a flavor twist? Add dried oregano and basil for an Italian-style version, or try a pinch of curry powder and turmeric for something a little different. The base stays the same—you’re just layering in your favorite spice profile.
Once you’ve got everything laid out, it’s time to start cooking. Let’s walk through the steps together.
How to Make Fried Squash at Home
If you’ve got a skillet and about 25 minutes, you’ve got everything you need to make this fried squash recipe from start to finish. We’re keeping it simple and stress-free, with clear steps and a few helpful tips to make sure every slice turns out crispy, golden, and irresistible.
1. Slice and prep the squash
Start by washing your squash (and zucchini, if using), then pat them dry with a clean towel. Slice into ¼-inch rounds—thin enough to cook quickly, but thick enough to hold their shape. Set aside and blot any extra moisture.
2. Set up your dredging station
In one shallow bowl, beat the egg with the milk until smooth. In another bowl, stir together the flour, cornmeal, salt, pepper, garlic powder, and paprika. Make sure it’s evenly mixed—this blend is what gives the coating its crisp, golden finish.
3. Heat the oil
Pour about ½ inch of vegetable oil into a heavy-bottomed skillet (like cast iron or stainless steel) and set it over medium to medium-high heat. You’ll know it’s ready when a tiny sprinkle of the dry mix sizzles on contact—aim for around 350°F if you’re using a thermometer.
4. Coat the squash slices
Working a few at a time, dip the squash rounds into the egg mixture, letting the excess drip off. Then press both sides into the dry coating, gently pressing to help it stick. Lay them on a plate until you’re ready to fry.
5. Fry in batches
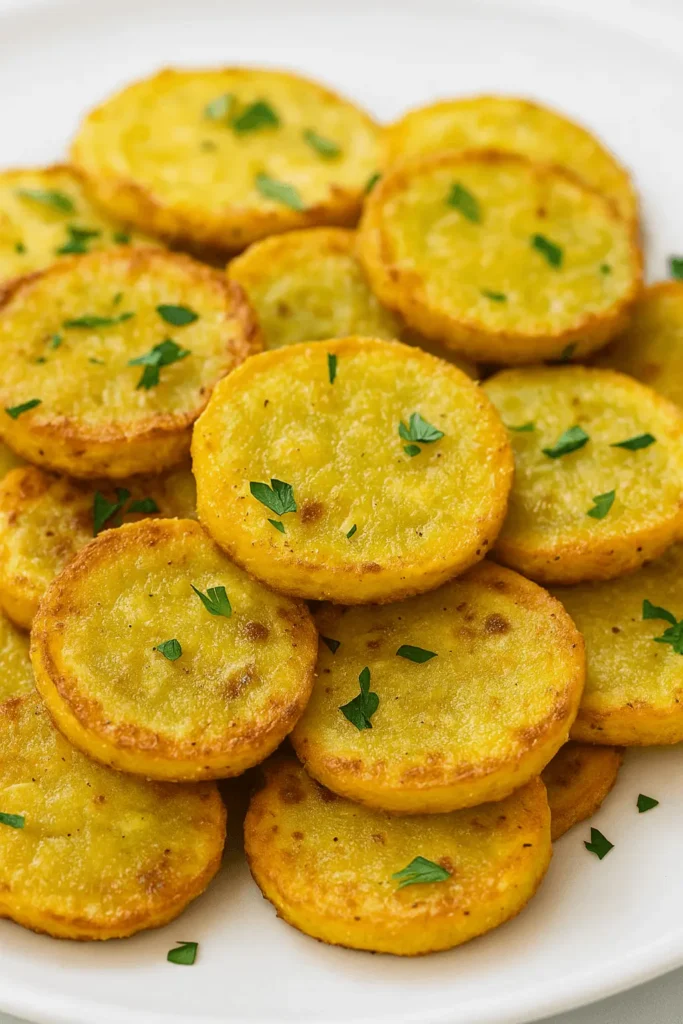
Carefully place the coated slices into the hot oil, being sure not to crowd the pan. Fry for 2–3 minutes on each side, or until the coating is deep golden brown and the squash is fork-tender inside. Use tongs to flip and remove when done.
Tip: If your oil starts smoking, it’s too hot—lower the heat a bit. If the slices aren’t sizzling immediately, bump the heat up slightly.
6. Drain and keep crisp
Transfer the fried squash to a wire rack or paper towel-lined plate. Sprinkle with a pinch of salt while they’re hot, if desired. Repeat with remaining slices.
7. Serve warm and enjoy
Fried squash is best enjoyed hot and fresh, but you can also keep it warm in a 200°F oven while finishing up the rest.

This is the part where everyone starts wandering into the kitchen asking, “Is it ready yet?” And honestly… they’re right to ask. It’s that good. Up next, I’ve got a few helpful tips and fun ways you can customize this recipe even more. Let’s make it your own!
Fried Squash Recipe Tips and Easy Variations
Once you’ve nailed the basic steps, there’s so much room to make this fried squash recipe your own. Think of this section as the extra help you’d get from a friend who’s made it a dozen times and knows all the tricks.
Here are some practical tips and fun ways to switch it up:
- Keep it dry: Always pat your squash slices dry before dipping—extra moisture can cause the coating to slip or get soft in the pan.
- Check your oil temp: If the oil’s too cool, your squash will absorb more than it should and feel heavy. It should shimmer slightly and sizzle when you drop a tiny bit of coating in.
- Don’t overcrowd the pan: Give each slice a little space. Crowding drops the oil temperature and keeps everything from crisping up properly.
- Use a rack, not just paper towels: Draining on a wire rack helps keep the bottoms from getting soggy while you finish the batch.
- Swap the seasoning: Want an herby flavor? Add a pinch of dried oregano and thyme. Craving something bolder? Cajun or taco seasoning makes for a fun twist.
- Mix in zucchini: This recipe works beautifully as a fried squash and zucchini combo—just slice them evenly so they cook at the same pace.
- Go cheesy: Stir grated Parmesan into your coating mix for an extra savory crunch.
- Try different coatings: No cornmeal? Use plain breadcrumbs or panko for a lighter texture with a golden finish.
Once you find the version that fits your table best, it becomes one of those repeat recipes everyone asks for. And speaking of the table—let’s talk about what to serve with your crispy squash!
Serving Ideas for Fried Squash Everyone Will Love
This fried squash recipe brings big comfort and crispy edges to just about any meal. Whether you’re serving it as a side dish, a snack, or part of a bigger spread, there are plenty of tasty ways to enjoy it.
Here are a few favorites from our kitchen:
- Southern-style dinner plate: Serve alongside grilled chicken, green beans, and buttery mashed potatoes for a down-home classic.
- Snack platter favorite: Pile onto a tray with dipping sauces like ranch, honey mustard, or garlic aioli—perfect for weekend snacking.
- Brunch companion: Add a few slices next to scrambled eggs and toast for a cozy, veggie-forward brunch.
- Summer cookout star: These pair perfectly with burgers, barbecue chicken, or veggie skewers at your next backyard gathering.
- Easy lunch side: Pop a few leftover slices into your lunchbox—great with a sandwich or salad.
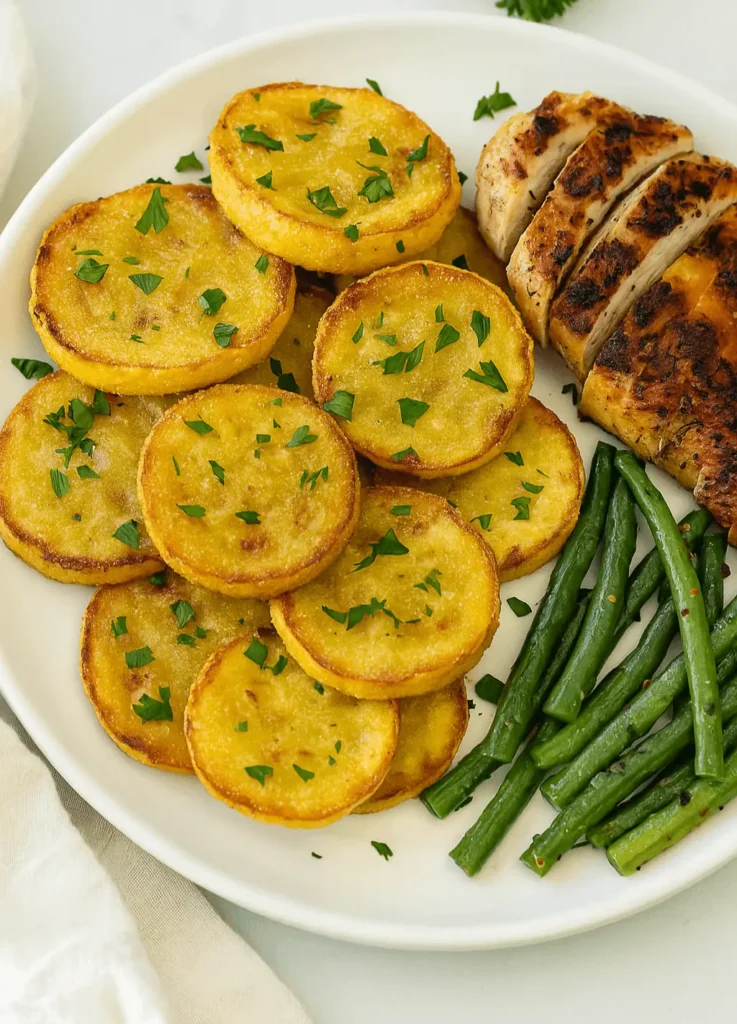
Whether you’re setting the table for a casual family meal or a summer get-together, these crispy rounds are always a hit. And if you’re lucky enough to have leftovers, here’s how to keep them fresh.
How to Store and Reheat Fried Squash the Right Way
Even if the plate’s nearly cleared, you might have a few golden rounds left behind. Don’t worry—this fried squash recipe holds up surprisingly well with a little care. Here’s how to save and reheat them without losing that delicious crunch.
To store:
- In the fridge:
Let the fried squash cool completely, then place it in a single layer inside an airtight container lined with a paper towel. This helps absorb moisture and keeps the coating from softening too much. Store for up to 3 days. - In the freezer (yes, it works!):
Arrange slices on a parchment-lined baking sheet and freeze until solid. Then transfer to a freezer-safe bag. They’ll keep for about 2 months.
To reheat:
- Oven method:
Place slices on a wire rack over a baking sheet and warm at 375°F for 8–10 minutes. This helps bring the crunch back without overcooking the inside. - Air fryer option:
Heat at 370°F for 5–6 minutes, flipping halfway through. It works especially well for frozen slices too. - Skillet reheat:
Add a touch of oil to a pan and warm the slices over medium heat until crisp again, flipping once.
There you go—no soggy leftovers here! Just warm, crispy squash you’ll be glad to have again.
More Delicious Recipes You’ll Love

Fried Squash Recipe
Ingredients
- 4 small yellow squash sliced into ¼-inch rounds
- ½ cup all-purpose flour
- ½ cup fine yellow cornmeal
- 1 teaspoon kosher salt
- ½ teaspoon black pepper
- ½ teaspoon garlic powder
- ¼ teaspoon smoked paprika
- 1 large egg
- ¼ cup milk
- Vegetable oil enough to fill skillet ½ inch deep
Optional:
- 2 small zucchini sliced
- Pinch of cayenne for a little heat
- 2 tablespoons grated Parmesan mixed into coating for extra flavor
Instructions
- Prep squash: Wash and slice squash (and zucchini if using). Pat dry.
- Mix coatings: Beat egg with milk in one bowl. In another, combine flour, cornmeal, and seasonings.
- Heat oil: Fill skillet with ½ inch oil and heat over medium-high until shimmering.
- Dredge: Dip squash in egg wash, then coat with the dry mix, pressing lightly.
- Fry: Cook slices 2–3 minutes per side until golden brown. Don’t crowd the pan.
- Drain: Transfer to a wire rack or paper towels. Sprinkle with salt while hot.
- Serve warm: Best enjoyed fresh out of the pan!
Notes
FAQs About This Fried Squash Recipe
Got questions? You’re not alone! Here are a few helpful answers to common things folks wonder when making this fried squash recipe. Whether you’re trying it for the first time or just want to tweak it, these tips will help you get it just right.
1. Can I use zucchini instead of squash?
Absolutely! This recipe works just as well with zucchini or even a mix of both. Just make sure to slice them the same thickness so everything cooks evenly. It’s a great way to make fried squash and zucchini all in one batch.
2. What’s the best oil for frying?
Any neutral, high-heat oil like vegetable, canola, or avocado oil will do the trick. You want something that lets the flavor of the squash shine without burning or getting too smoky.
3. How do I keep the coating from falling off?
A few simple tricks: First, pat the squash dry before dipping—moisture makes it harder for the coating to stick. Then be sure to press the flour and cornmeal mixture onto each slice gently after the egg dip. That little bit of pressure really helps it stay put while frying.
4. Can I bake this instead of frying it?
You can! It won’t be quite the same as classic pan-fried squash, but it still comes out tasty. Brush or spray the slices lightly with oil and bake at 400°F for about 20–25 minutes, flipping halfway through. Keep an eye on them until they’re golden and crisp.
5. What can I dip them in?
Ranch dressing is a classic, but don’t stop there! Try garlic aioli, chipotle mayo, or even a simple squeeze of lemon over the top. The crispy texture of this fried squash recipe pairs well with just about anything.
6. Can I make these ahead of time?
These are definitely best fresh from the skillet, but if you need to make them ahead, you can reheat them in the oven or air fryer to bring back some crunch. Just avoid stacking them while storing to help preserve the coating.
From family dinners to backyard snacks, this fried squash is always a hit. Let’s wrap things up with a quick look at everything we’ve covered so far.
Conclusion
There’s just something special about a skillet full of golden, crispy squash—it brings everyone to the kitchen with that familiar, comforting aroma. This fried squash recipe has a way of turning a few simple ingredients into something that feels a little nostalgic and a whole lot satisfying. It’s easy to make, endlessly flexible, and always a hit around the table.
If you had a chance to try it, I’d be so happy to hear how it turned out in your kitchen.